Electude - Frequently Asked Questions (FAQ)
Electude Frequently Asked Questions (FAQ)
- How can I reset or change a student's password?
- Why are there two different schematics in the simulator?
- How and why do I create courses?
- Can I add a student via a teacher access?
- How can I create modules myself?
- Why E-Learning?
- Will the system work on my device?
- How do I assign learning content to a class?
- Where can I find the results of the fully automatic correction?
- Does the system require each student to be added individually?
- Why are the results of class XY not saved?
- How can I schedule a course?
- How to move a subordinate course to the main directory?
- This FAQ is not applicable when Electude is set to English
- What needs to be considered for learners who are about to graduate? (Also applies to learners and classes that depart early)
1. How can I reset or change a student's password?
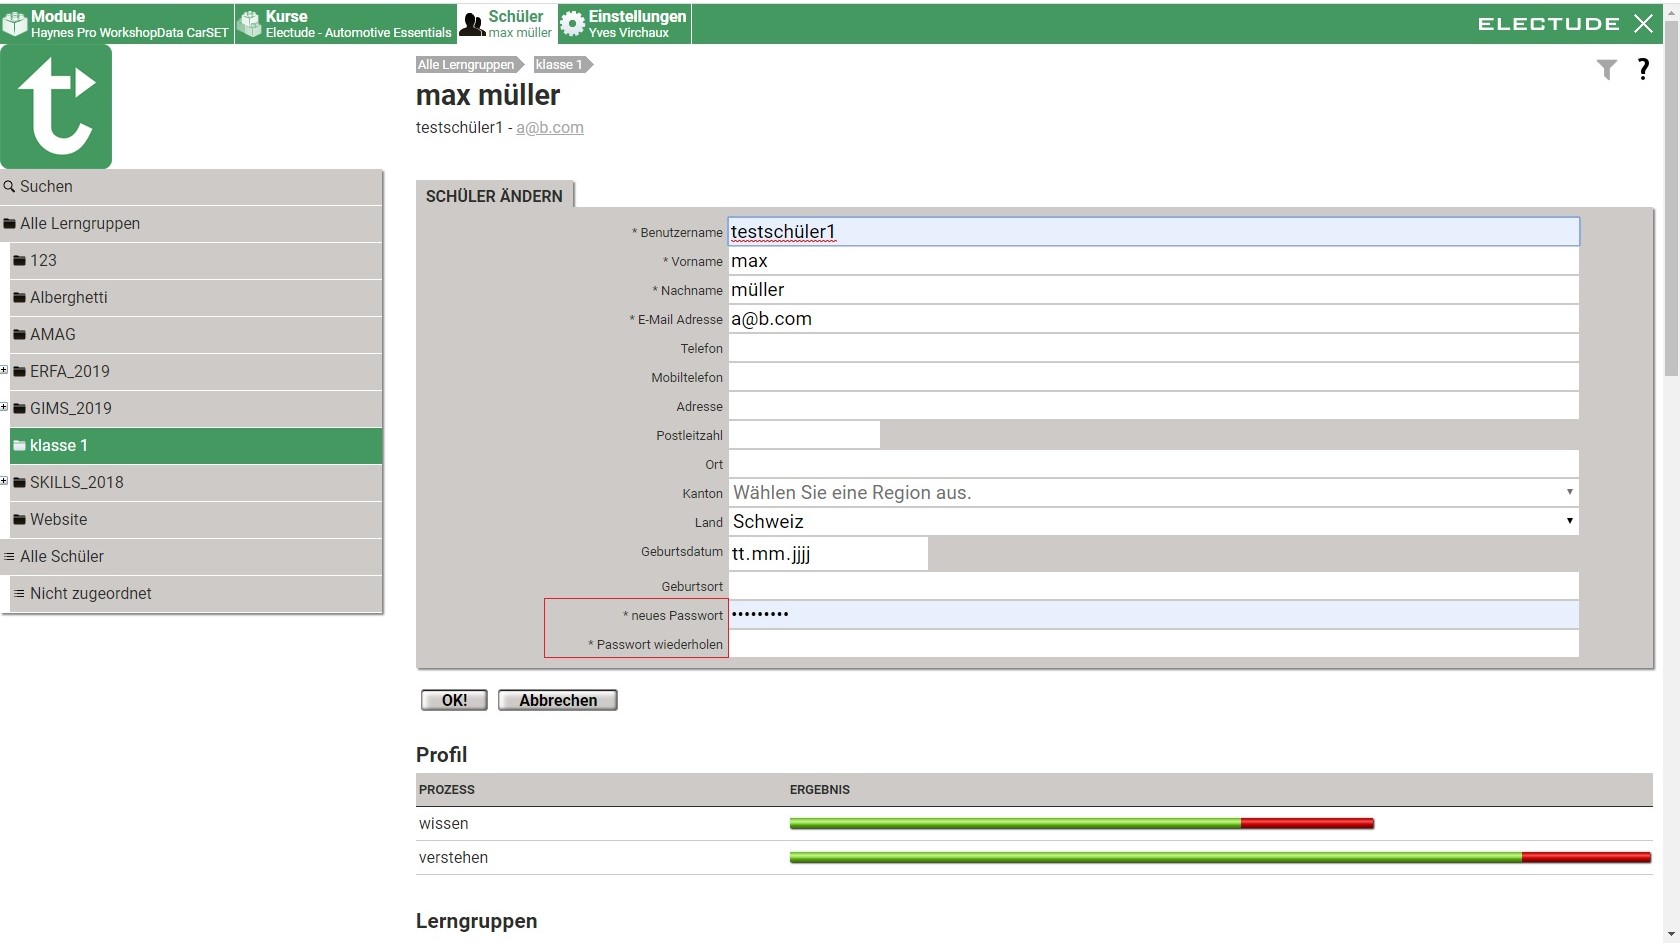
- The password can be changed in the menu Student
- Find and select the relevant Student, open the detailed view with the pencil icon at the top (picture 1)
- Overwrite the password in the detail view and confirm with OK! (picture 2)

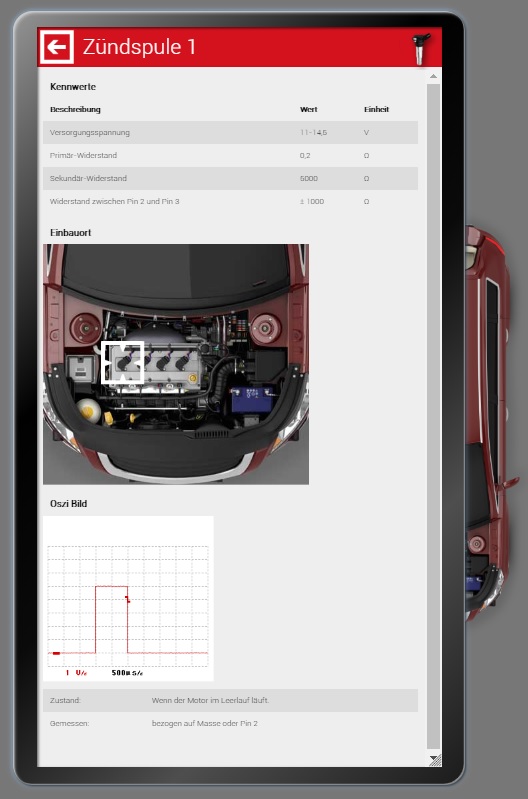
2. Why are there two different schematics in the simulator?
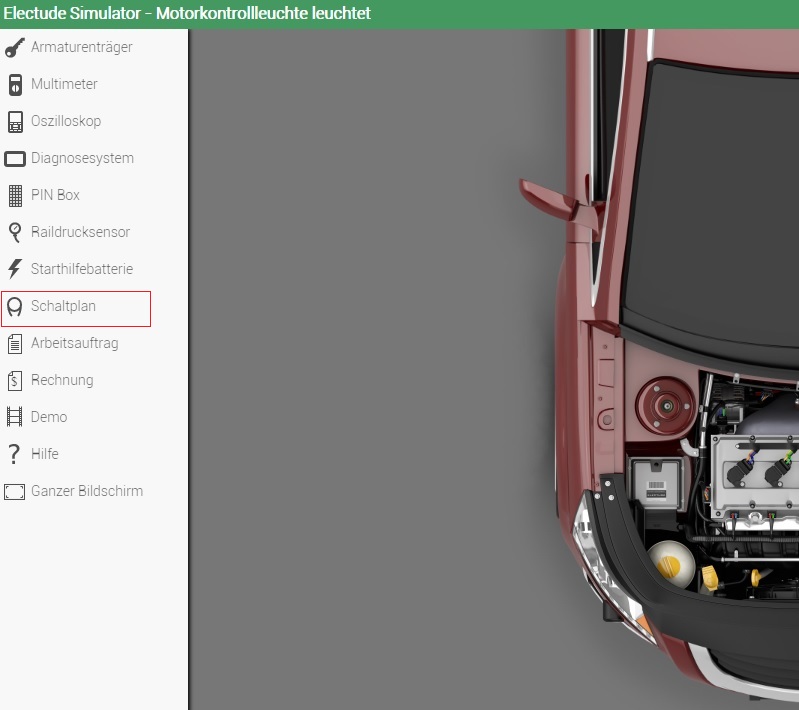
- The circuit diagram in the menu of the instruments can be used for replacing a line (pictures 1, 2)
- The diagnostic system circuit diagram can be found here (picture 3):
[Ignition on] Diagnostic system / Identify vehicle / System / Engine management / Information / Circuit diagram
- In this circuit diagram, components can be selected by clicking on them and the supply voltage, coil resistances, installation location, signal form and much more is displayed
- This circuit diagram is very important for the student, it allows a diagnosis of a still unknown component (pictures 4, 5)


3. How and why do I create courses?
- Navigate to Self-made in the Courses menu
- Create a new course with the plus symbol (picture 1)
- Use the Add button to create the course
- You can put together a course yourself or use a predefined course. Courses can be nested within each other like folders in a tree structure. You can insert further modules into a sub-course. With the help of courses custom-made content is permanently stored in the system and can be retrieved for upcoming semesters and classes.

4. Can I add a student via a teacher access?
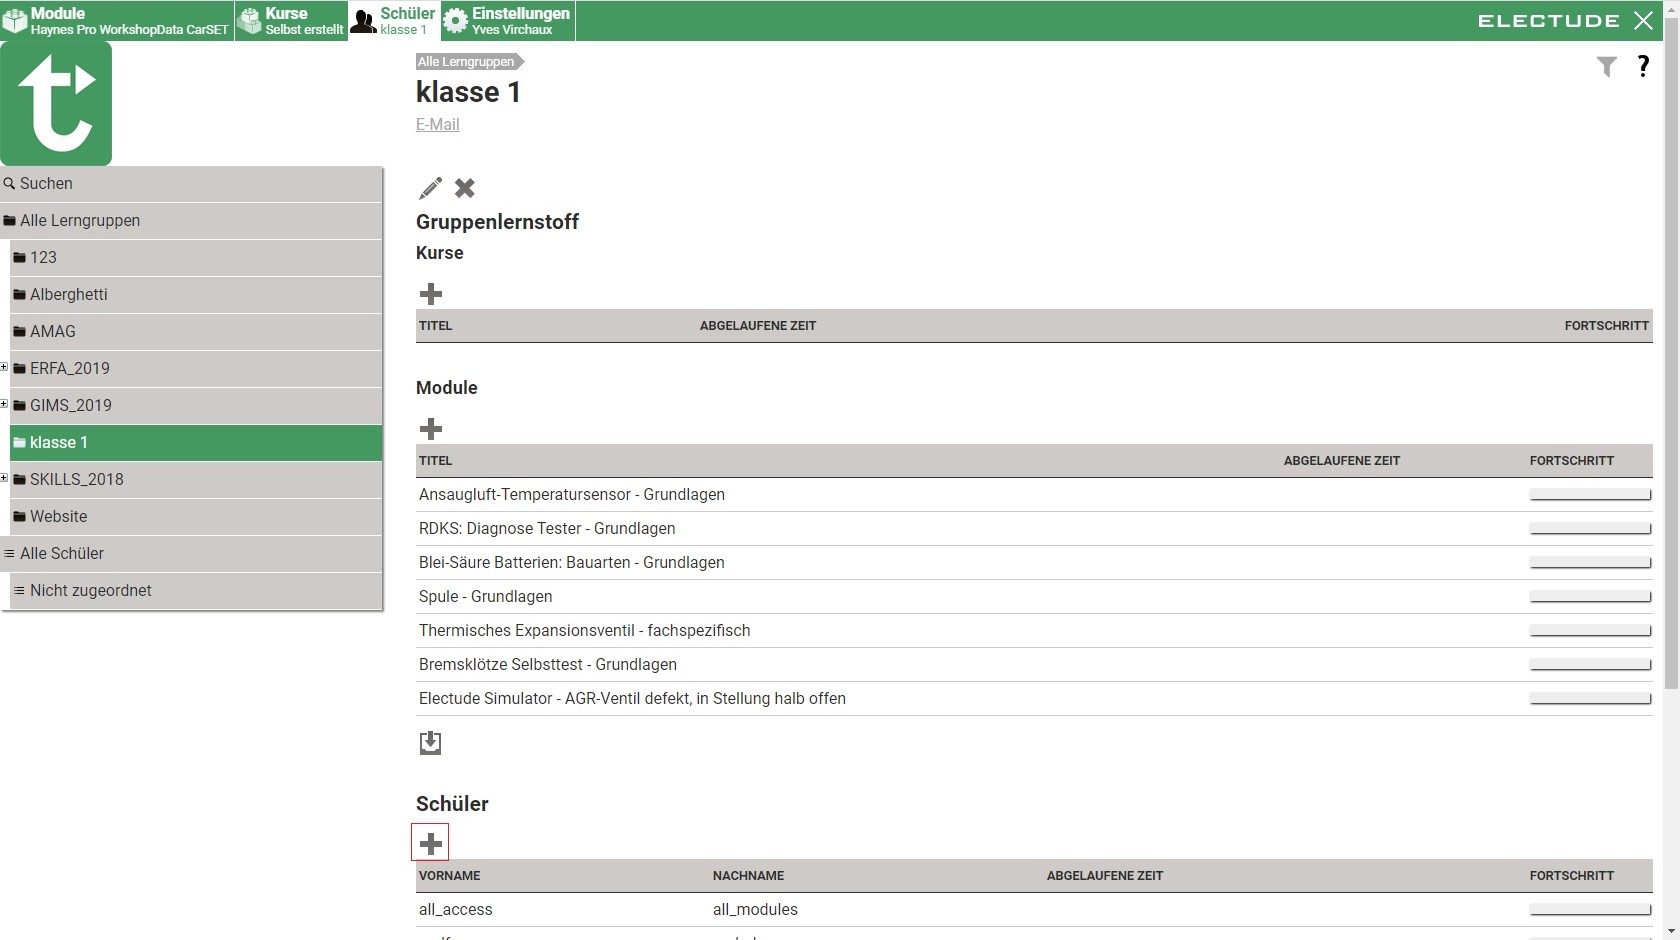
- Students can be created via the teacher access
- To do this, you must first create or select a class
- Navigate to the desired class, or create the class
- Create a new Student using the plus icon (picture 1)
- Use the Add button to create the student
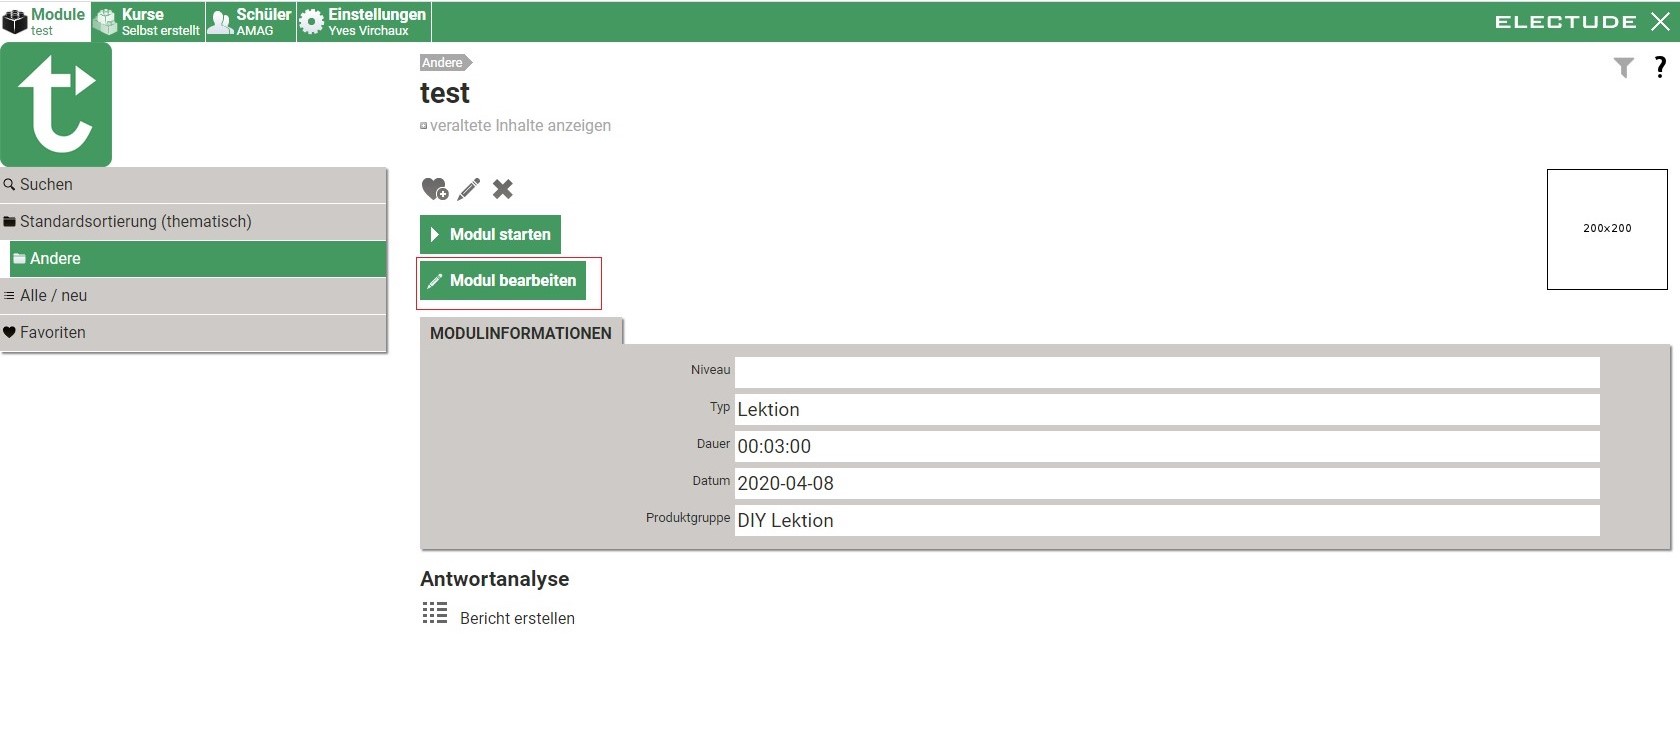
5. How can I create modules myself?
- Modules can be created via the teacher access. Even self-made modules will benefit from the fully automatic correction of the results. Therefore: digitize existing worksheets!
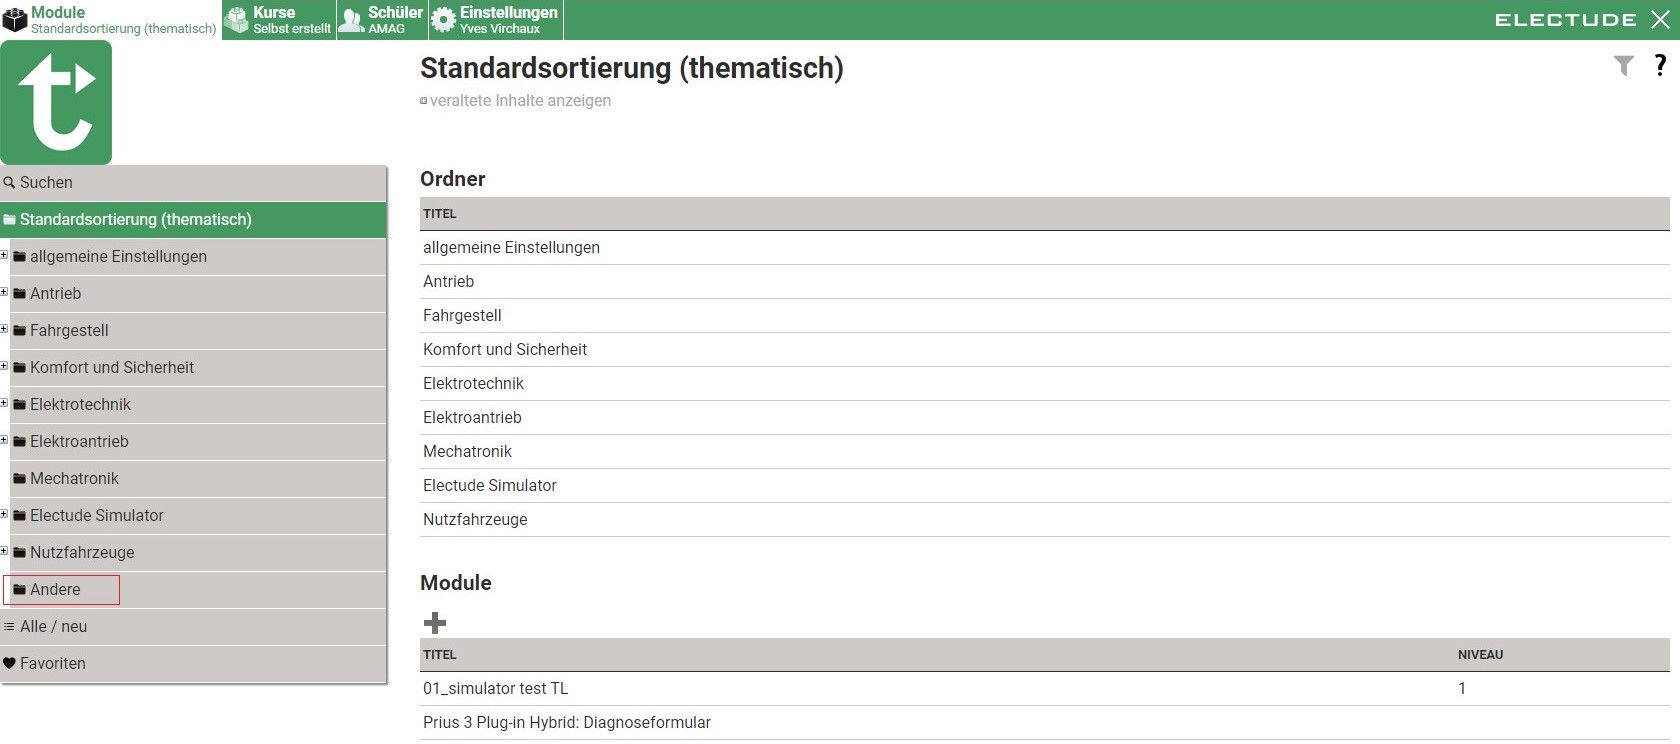
- For this purpose, navigate to the menu item Modules
- Select the following path in the folder structure:
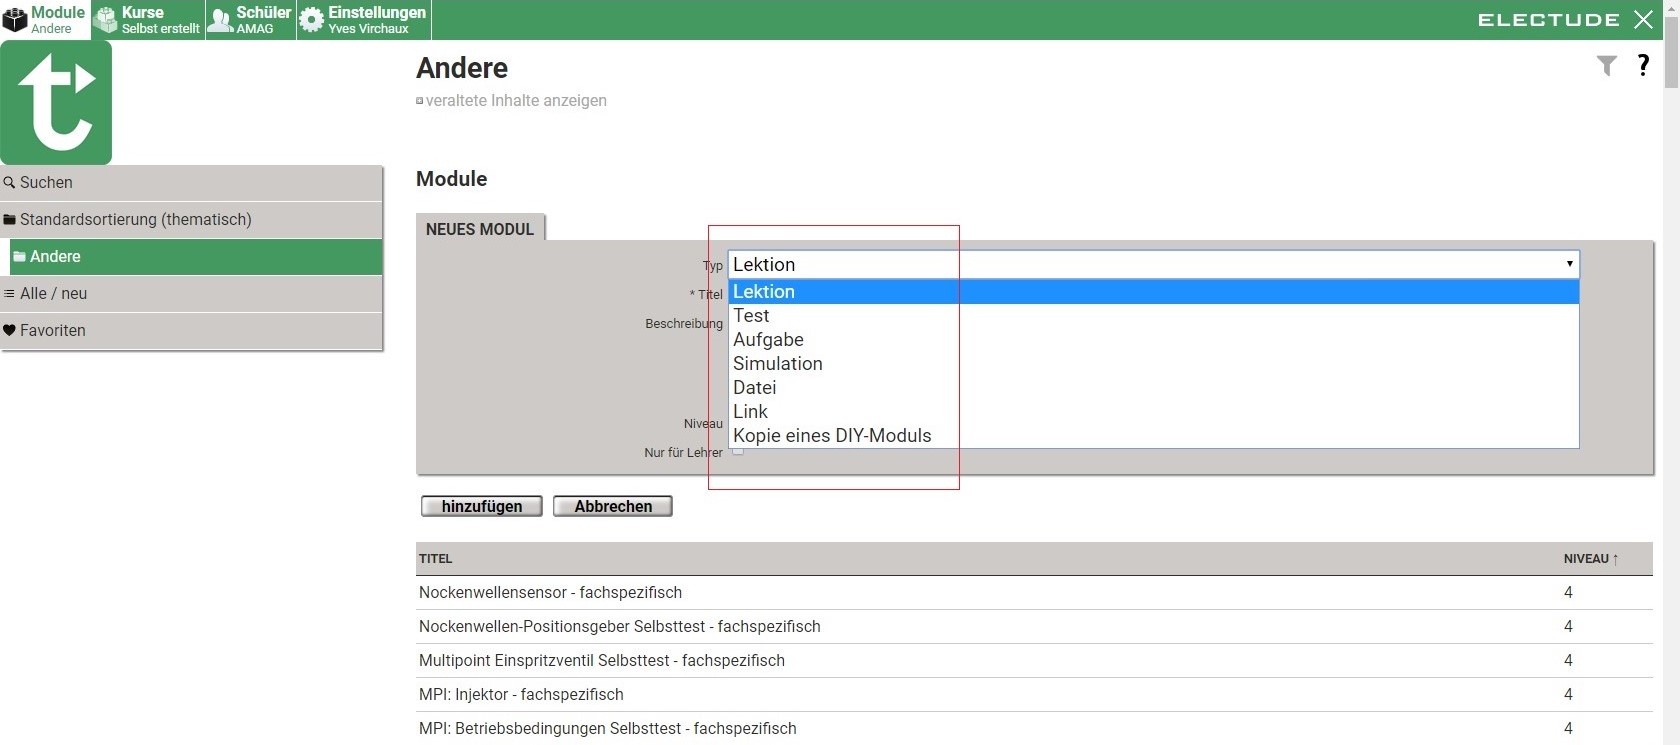
Default (by subject) / Others (picture 1) - Use the plus symbol to create and name a new module (picture 2)
- Select module type, select lesson for a standard module (picture 3)
- Add
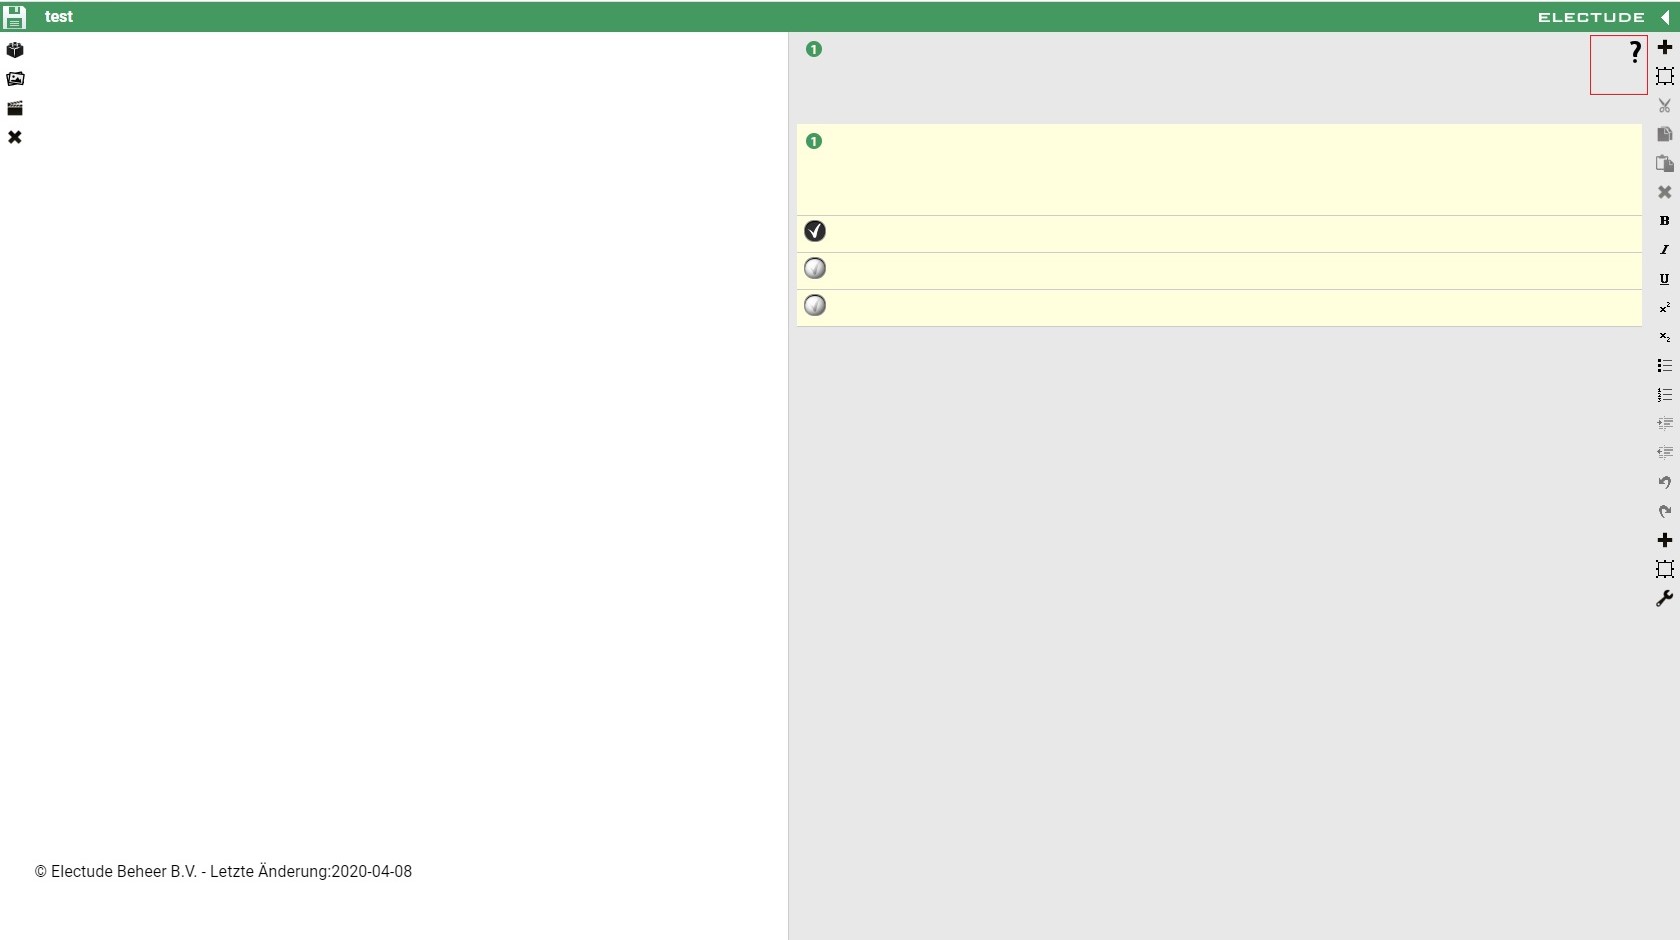
- Editing the module (picture 4)
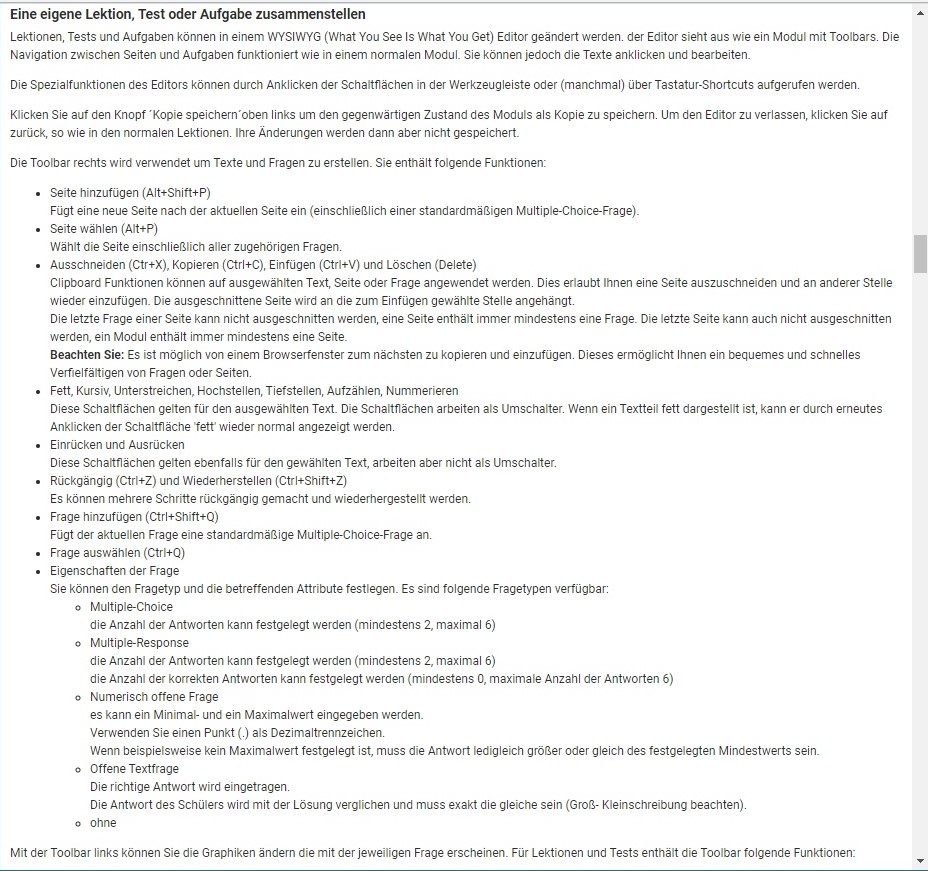
- Click on the question mark at the top right-hand side to call up the instructions for creating a module (pictures 5, 6)

6. Why E-Learning?
The vision of the founders led to the creation of a solution in 1990, which provides a unique and effective tool. The goal is to teach all learners in the automotive field by making it interactive, engaging, highly efficient and entertaining through the use of technology. This makes the pioneering work of the two teachers an unparalleled approach to automotive education.
The 400'000 learners in the system now enjoy this solution daily in 35 languages, with 99.9% uptime and completely without updates.
While the 40'000 teachers use the fully automatic correction of results to gain more time for the learners.
Over half a dozen of the largest car manufacturers (examples here) worldwide use our LCMS every day to train new specialists.
7. Will the system work on my device?
Although we do not know which device, the answer is yes! Our LCMS runs perfectly on all devices under Windows, MacOS, Android, iOS and Linux. Furthermore, the input is flexible, whether mouse, keyboard or touchscreen.
8. How do I assign learning content to a class?
Navigate to the desired class in the teacher access. Then navigate to the desired course (for example: Courses/Automotive Essentials/ Elementary/Electrical Engineering Elementary/Measurements Elementary). Drag the course to the tab 'Student' (at the top of the screen) where the correct class was preselected at the beginning.
9. Where can I find the results of the fully automatic correction?
In the tab 'Student' you can search for the class (or the desired learner) concerned. You will find the progress bars in the overview and the detailed results in the respective profile. For lessons you see the progress, for simulators additionally the log file and for self-tests the individual questions with the answers.
10. Does the system require each student to be added individually?
The system contains a batch processing for reading in learners. With administrator access, student lists with hundreds of students can be added with a single click. These are automatically divided into learning groups.
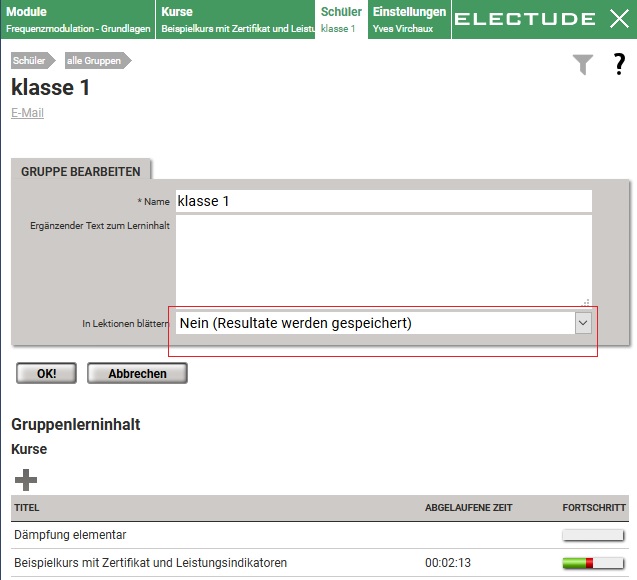
11. Why are the results of class XY not saved?
- Navigate to the desired class in the teacher access. The teacher can edit the "Edit Group" using the pencil icon. On the edit page under the title "Browse Lessons" the option No must be selected to save results. (Bild 1)
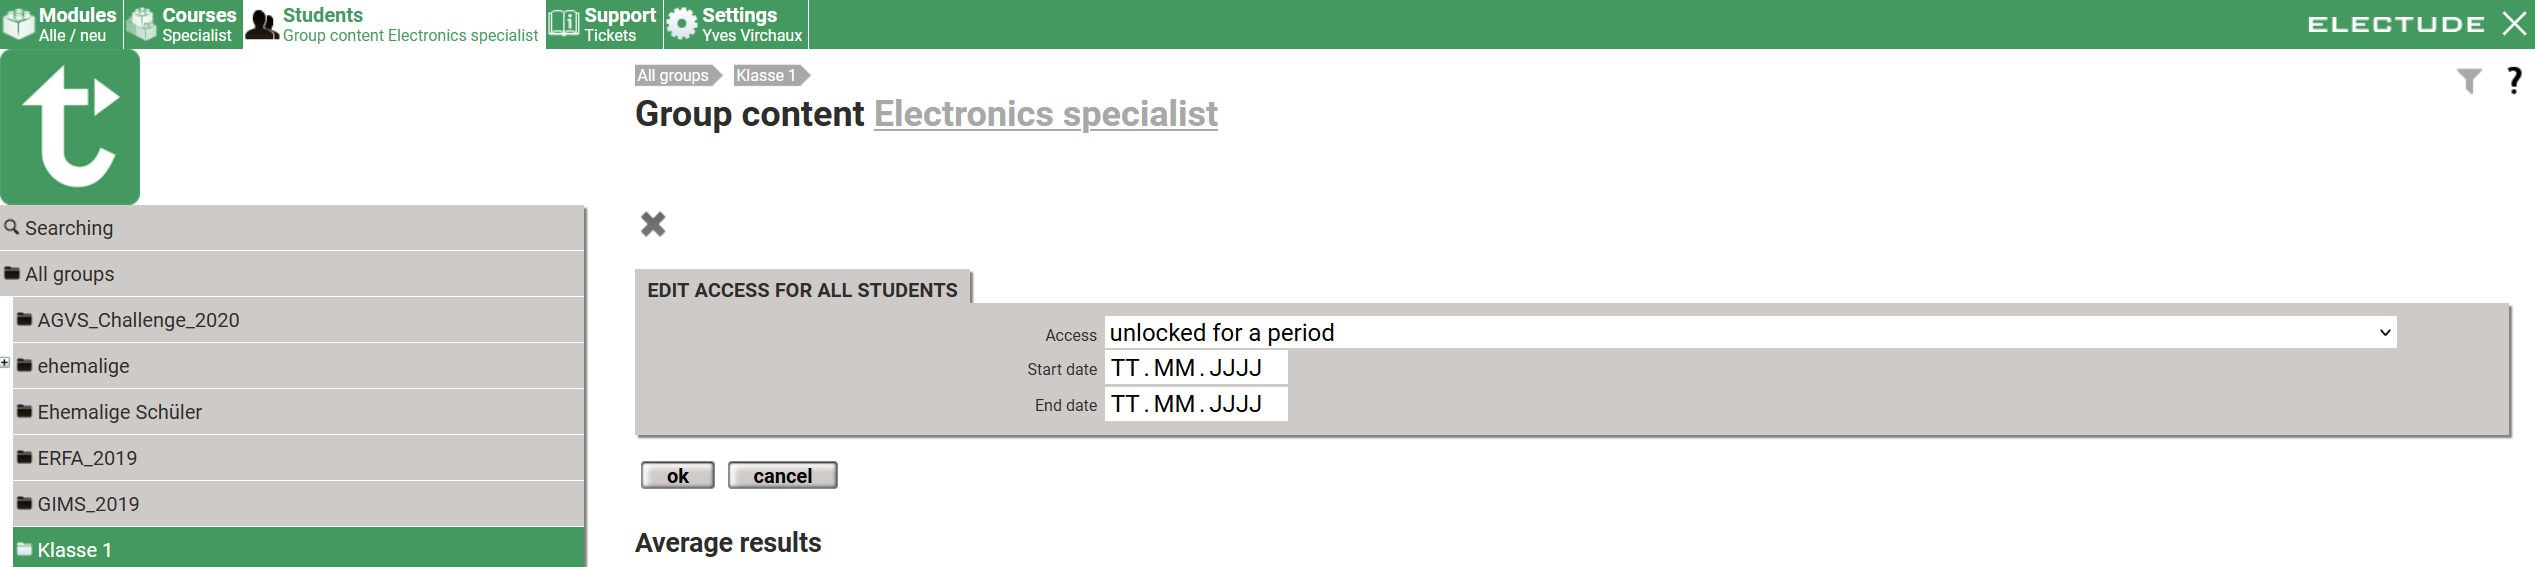
12. How can I schedule a course?
- First we need a self-created or existing course X for this operation.
- In the next step, the course must be assigned a class Y.
- Then select the course via "Students / Class Y / Course X" and change access for all students via the padlock symbol .
- The option "Unlocked for a specific period of time" can now be selected from the drop-down menu.
- Select the desired period here and confirm your choice.
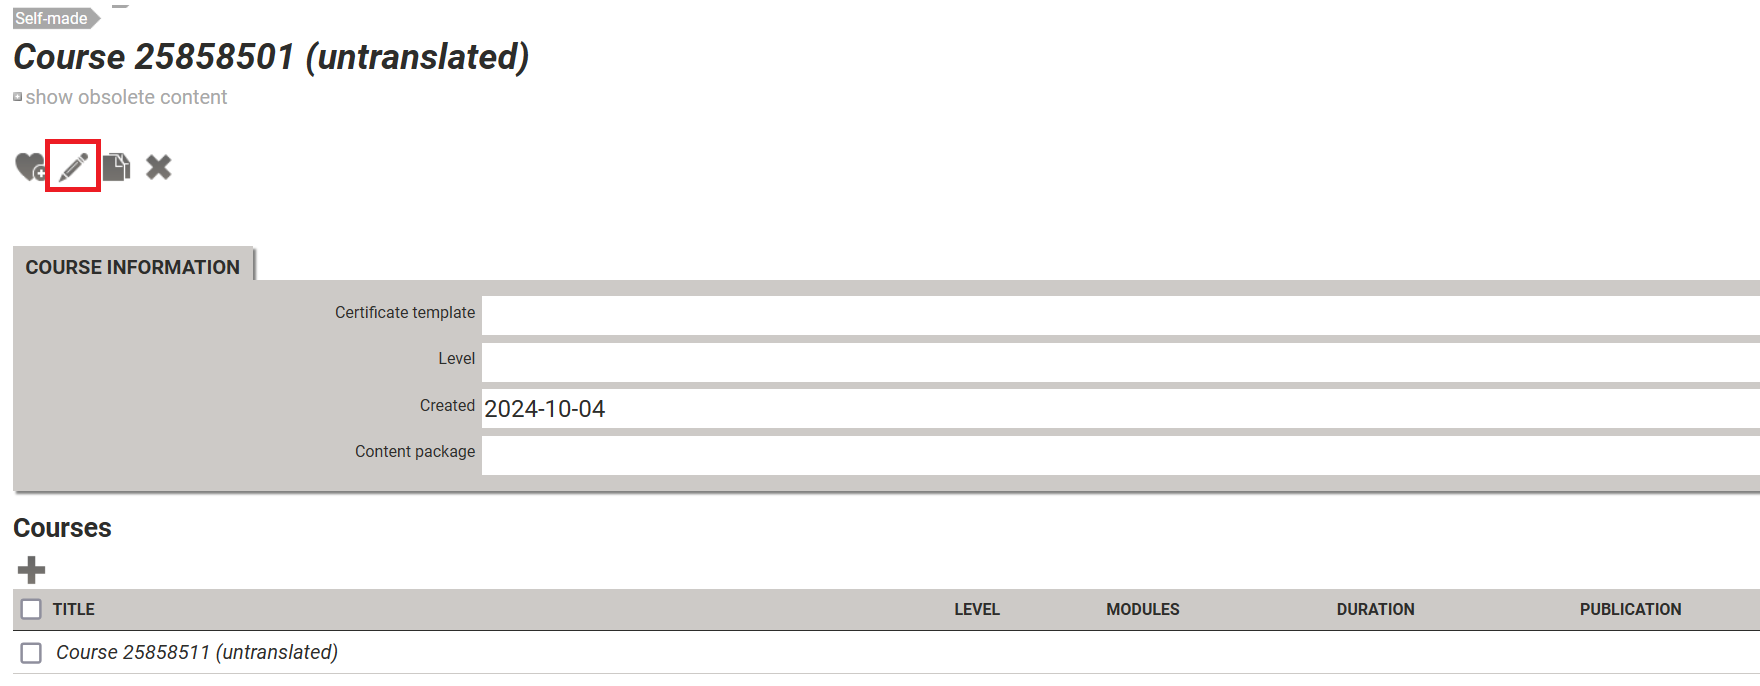
13. How to move a subordinate course to the main directory?
- Navigate to the course to be moved
- 2. Select the pencil icon to edit the course (image 13.1)
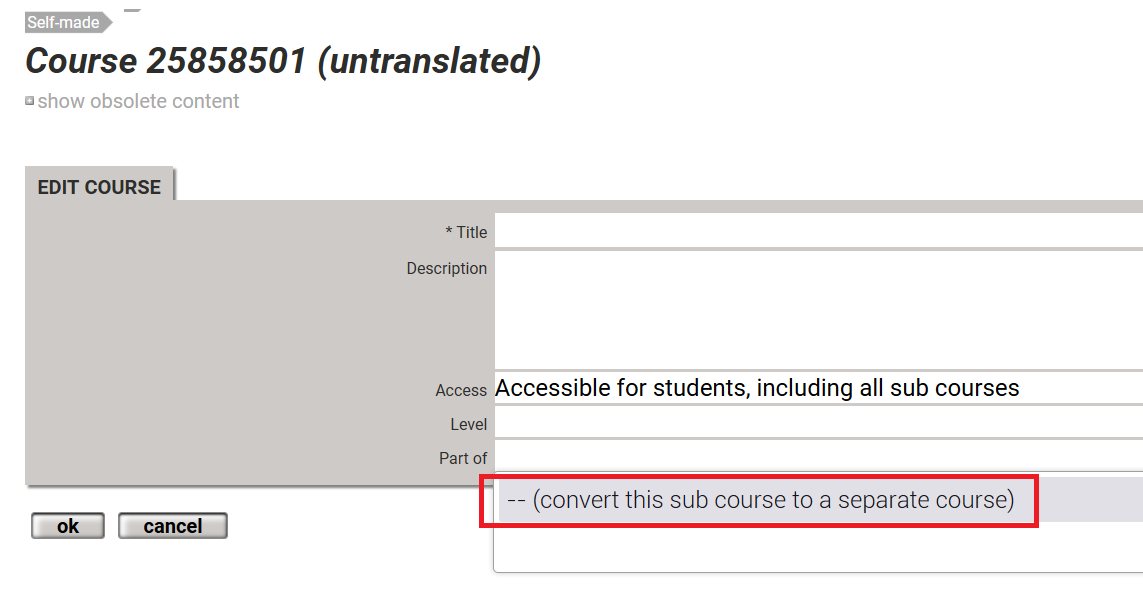
- Select the following option for the title “Part of” in the course editing:
a. (convert this sub course to a separate course) (image 13.2) - Confirm with OK
Alternatively to be found under the URL https://YourDomain.electude.com/help/#folderbundlelock.
14. This FAQ is not applicable if the language is set to English!
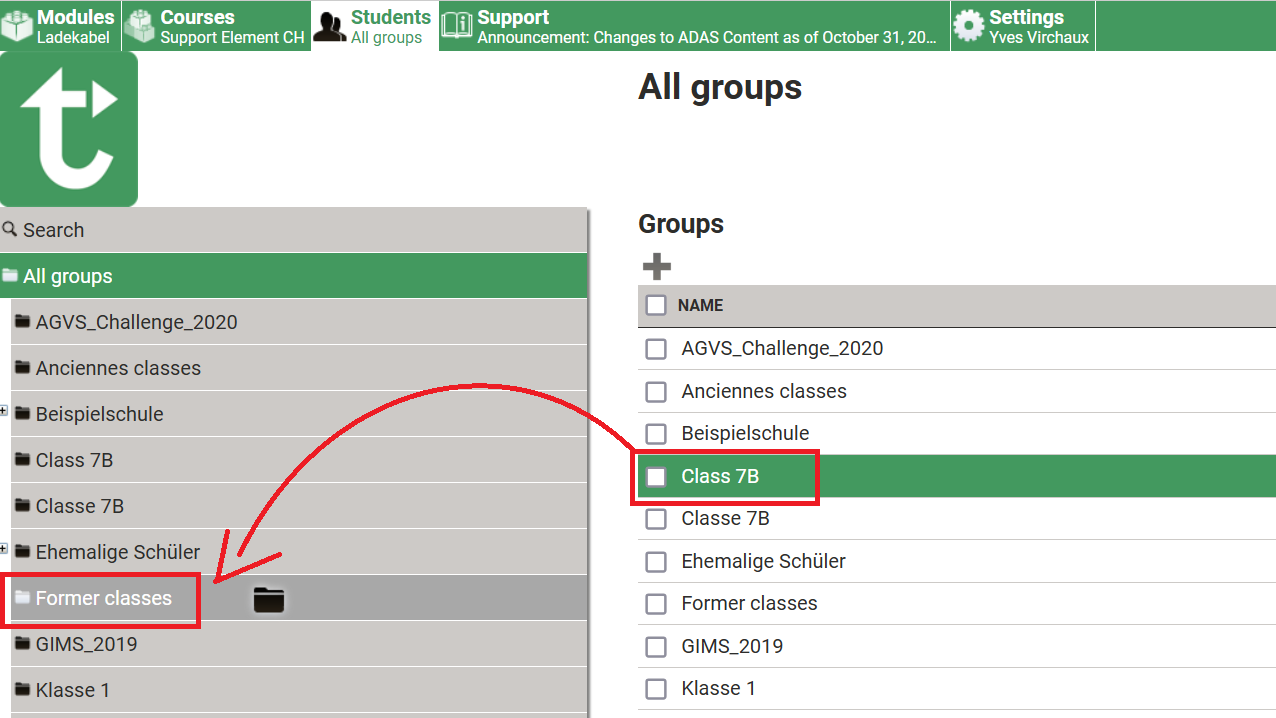
15. What needs to be considered for learners who are about to graduate? (Also applies to learners and classes that depart early)
- Navigate to the ‘Students’ tab and select ‘All groups’
- 2. Use the left mouse button to move the desired class from the right (overall view) to the ‘Former students’ folder in the folder structure on the left (image 15.1)
If you do not yet have such a folder, create it using the plus symbol at the top.
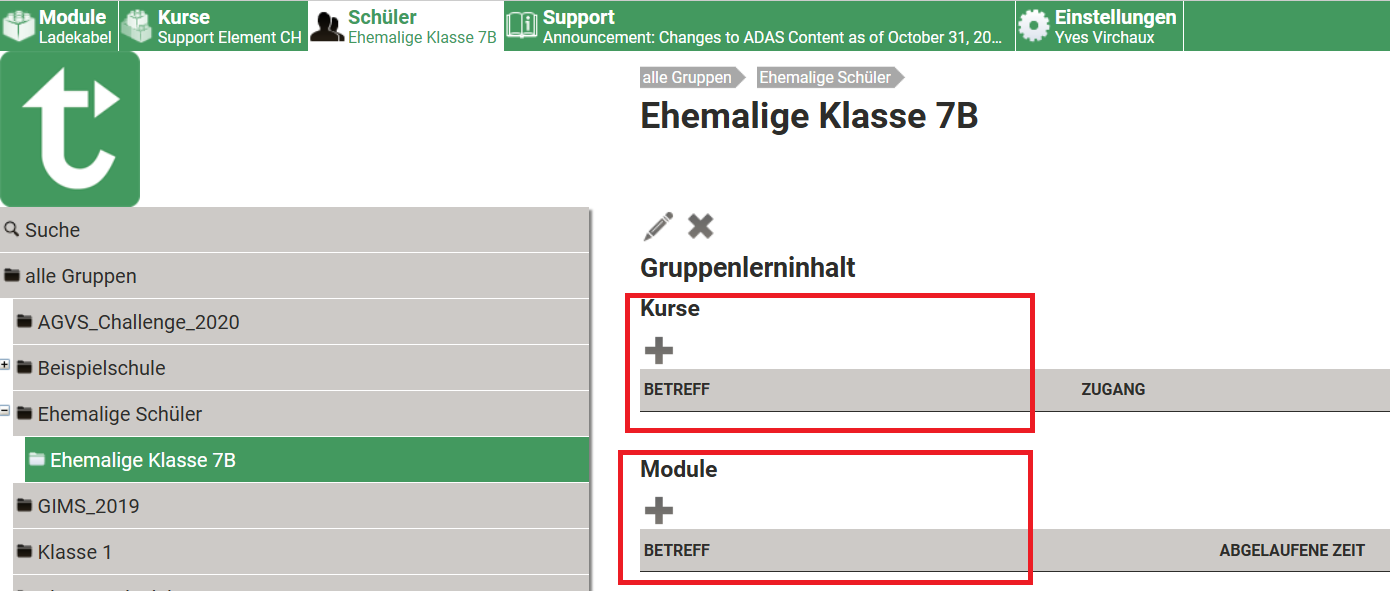
- As soon as a class reaches the end of the teaching period, the students may continue to access their login free of charge (as long as the school's domain exists)
- 4. It is the responsibility of the teacher to remove all content from the class. Please navigate to the class and remove all courses and all modules (image 15.2)
- The last step allows the students to continue viewing all modules already edited.
- Step 4 is important and must be observed because otherwise licences will be used up by paying learners.